The secret to unforgettable Philippine festival photography isn’t your camera; it’s your ability to master the glorious, vibrant chaos.
- Success hinges on logistical pre-planning, from booking rooms months in advance to knowing where to stand on parade day.
- Protecting your gear from paint and crowds is non-negotiable, requiring specific strategies beyond a simple lens cap.
- The most powerful images come from understanding and respecting the culture, not just observing it from a distance.
Recommendation: Shift your focus from technical settings to strategic navigation and cultural immersion. The best shot is the one you planned for long before you arrived.
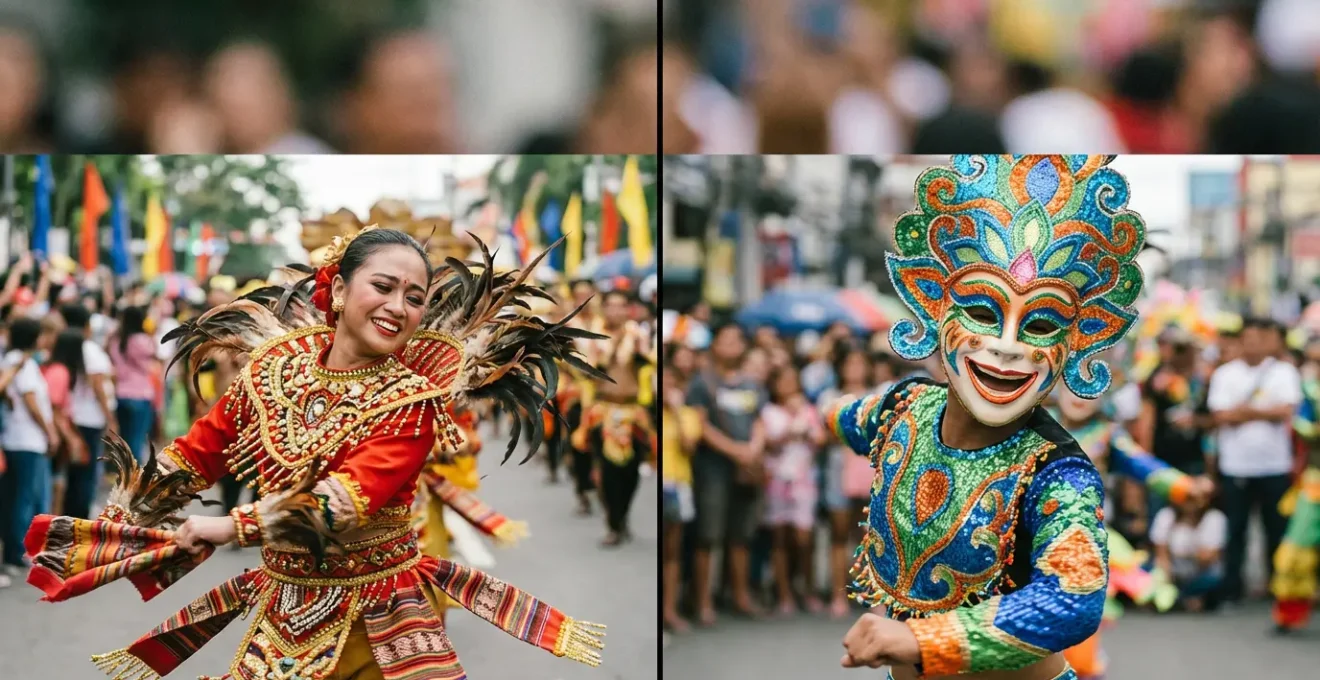
The shutter clicks, but the sound is swallowed whole by a thousand drums. A sea of bodies, a riot of color, and the electric scent of grilled meat and sweat fill the air. This is the sensory overload of a Philippine fiesta—a street photographer’s dream and a logistical nightmare. Many photographers arrive armed with their best lenses and a list of ideal camera settings, believing that technical skill is the key to capturing the soul of the event. They focus on freezing the perfect spin of a dancer or the peak emotion on a devotee’s face.
But they quickly discover a hard truth. The real challenge isn’t the photography; it’s everything that happens around it. It’s the surging crowds, the unexpected paint smears, the sold-out hotels, and the cultural nuances that can make or break your experience. The common advice to “get close” or “use a fast shutter speed” feels laughably inadequate when you can’t even find a clear line of sight or your camera is suddenly decorated with neon-green paint.
What if the key to breathtaking fiesta photography wasn’t in mastering your camera, but in mastering the environment itself? This guide is built on that premise. We’re putting aside the technical jargon to focus on the operational strategy—the chaos navigation. We’ll explore the logistical hurdles, the cultural deep dives, and the practical survival skills you need to not only survive a Philippine festival but to thrive in it, emerging with images that pulse with authentic energy and a story that goes deeper than the surface spectacle.
This guide provides a roadmap for photographers ready to immerse themselves in the chaotic joy of a Philippine fiesta. From securing your base of operations to understanding the sacred gestures, each section is a vital piece of the puzzle for capturing truly meaningful images.
Summary: A Photographer’s Field Guide to Capturing Philippine Fiestas
- How to Secure a Room in Cebu During Sinulog Without Paying Triple?
- The “Basurero” Risk: How to Avoid Paint Smearing at Festivals?
- Why Does the Ati-Atihan Involve Painting Faces Black?
- Street Food During Fiesta: How to Eat Safely Amidst the Chaos?
- When to Arrive on the Parade Route to Get a Front Row Spot?
- When to Visit Panagbenga to See the Flower Floats in Full Bloom?
- Fiesta vs. Daily Life: How Does the Vibe Change in Rural Barangays?
- How to Perform “Mano Po” to Show Respect to Filipino Elders?
How to Secure a Room in Cebu During Sinulog Without Paying Triple?
The first rule of Sinulog photography is securing your base camp. Arriving in Cebu during the third week of January without a reservation is a recipe for disaster. You aren’t just competing with other tourists; you’re competing with millions of devotees and returning locals. Prices don’t just increase; they skyrocket, and availability vanishes. Your logistical pre-visualization starts here, months before you even think about packing a lens.
The key is to act counter-cyclically. While others wait for the new year, you should be finalizing your booking as early as August. According to accommodation guides, you should book your accommodation as early as August (5-6 months in advance) to lock in reasonable rates. If you miss that window, all is not lost. Widen your search radius. Instead of focusing solely on the epicentre around Fuente Osmeña, consider adjacent cities like Mandaue or Lapu-Lapu. The commute via the MyBus system or a ride-sharing app like Grab might seem inconvenient, but it’s a small price to pay for affordability and a guaranteed bed.
Another pro-tip is to align your arrival with the festival’s rhythm. The main parade is the explosive finale, but the nine-day novena period leading up to it is a photographer’s goldmine. The streets are alive with energy, but the crowds are more manageable, and hotel rates can be 30-40% lower. Arriving a week early not only saves you money but also allows you to acclimate, scout locations, and capture the build-up of spiritual energy that defines Sinulog.
The “Basurero” Risk: How to Avoid Paint Smearing at Festivals?
In the throes of a street party, you become a target. The “basurero” or “painter” risk is real: joyful revellers armed with neon-colored paste see your clean shirt and expensive camera as a blank canvas. Protecting your gear and yourself isn’t paranoia; it’s a core part of your shooting strategy. The best lens for festival photography is a clean one, and ensuring it stays that way requires more than just a lens cap. It demands a proactive defense system.
Your first line of defense is a physical barrier. A disposable camera rain cover is your single most important piece of non-photographic gear. It’s a cheap, transparent layer that shields your camera body and lens from paint, water, and beer, while still allowing you to operate the controls. Pair this with a “decoy” outfit: a cheap, brightly colored t-shirt worn over your actual clothes that you won’t mind sacrificing to the festival gods. This layered approach allows you to absorb the fun without risking your valuable equipment or favorite shirt.
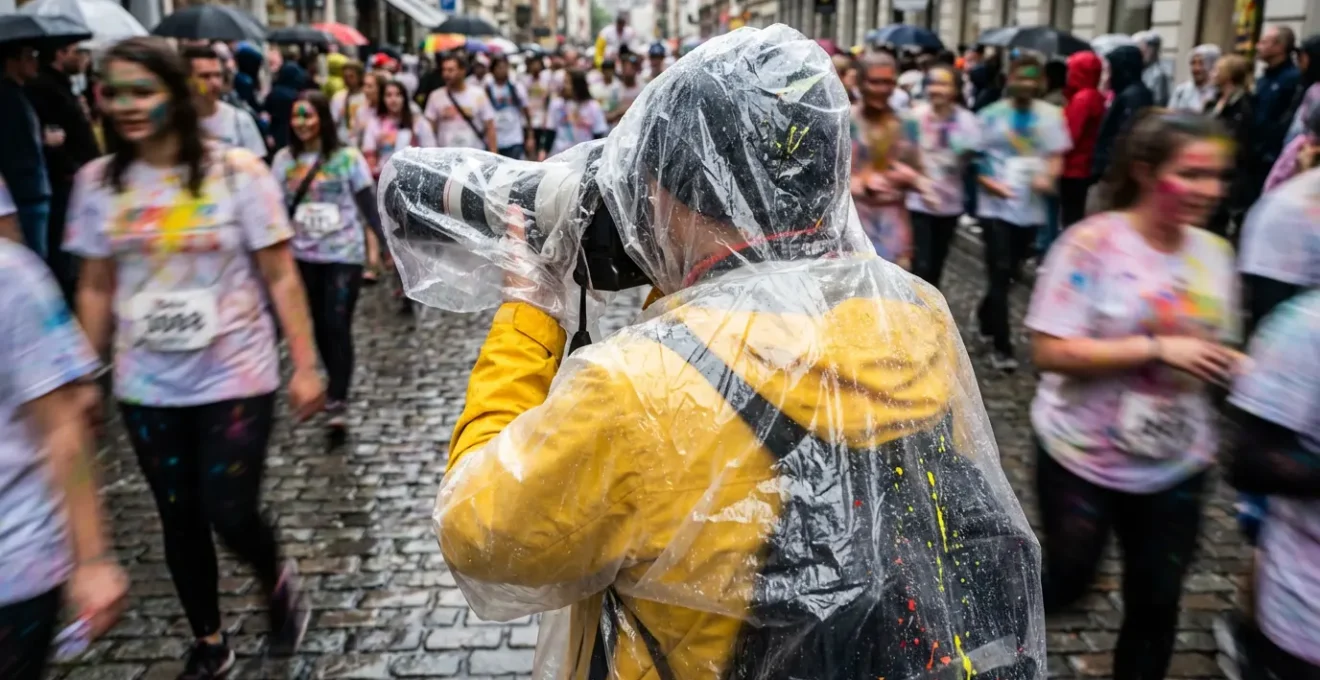
As the image above illustrates, navigating the chaos with protected gear is key. But physical protection is only half the battle. You must also master the “shoot-and-retreat” tactic. Dive into a paint-heavy zone, capture the explosion of energy, and then immediately move back to a safer, less chaotic area to review your shots. Non-verbal communication is also a powerful tool. A firm but friendly head shake and a smile, while holding your camera up protectively, often signals your intention to remain a documentarian, not a participant in the paint-smearing.
Action Plan: Your Paint Protection Strategy
- Gear Prep: Apply disposable camera rain covers before entering any dense crowd or known paint zones.
- Decoy Wardrobe: Wear a cheap, brightly colored outer t-shirt that can be stained or discarded after the event.
- Tactical Movement: Employ the ‘shoot-and-retreat’ method—enter intense areas for short bursts, then pull back to safety.
- Non-Verbal Cues: Use a clear, firm head shake and a smile to signal your non-participation to approaching painters.
- Clean-up Kit: Carry a small bottle of oil (like avocado or canola) and some cloths. An interesting finding from festival-goers is that using face oil effectively breaks down paint, making it easier to remove from skin and gear.
Why Does the Ati-Atihan Involve Painting Faces Black?
Stepping into Kalibo for Ati-Atihan, you’re immediately struck by the sight of performers, their faces and bodies covered in black soot. For a photographer, this is a powerful visual, but capturing it meaningfully requires understanding its origin. It’s easy to misinterpret, but this practice is not a caricature; it’s a profound act of historical reverence and solidarity. It’s the visual soul of the festival, and your photos will carry more weight if you know the story they’re telling.
Unlike Cebu’s Sinulog, whose origins are tied to the 16th-century arrival of the Spanish and the Santo Niño, the Ati-Atihan’s roots go back further, to a 13th-century pact. The story tells of ten datus (chieftains) fleeing Borneo who were granted refuge in Panay by the local Ati (or Aeta) people, a group with distinctively dark skin. The festival began as a celebration of this pact, with the lowlanders painting themselves black to honor and resemble their Ati benefactors. “Ati-Atihan” literally means “to be like the Atis.”
Over the centuries, the festival absorbed Catholic elements, particularly devotion to the Santo Niño, but the core act of painting oneself black remains a tribute to this foundational story of migration, welcome, and cultural exchange. When you photograph a soot-covered dancer, you are not just capturing a costume; you are documenting the living memory of this historic alliance. Your lens becomes a bridge between the present-day celebration and its ancient roots. This knowledge transforms a simple portrait into a narrative-rich image, filled with respect for the tradition you are witnessing.
Street Food During Fiesta: How to Eat Safely Amidst the Chaos?
In the middle of a parade, with drums beating a rhythm in your chest, hunger will eventually strike. But a festival is no place for a sit-down meal. For a photographer, eating is a tactical operation that must be executed quickly, safely, and preferably with one hand, leaving the other free for your camera. The street food scene is a vibrant part of the fiesta experience, but navigating it requires a smart approach to avoid both logistical fumbles and stomach troubles.
Your guiding principle should be “stick and sealed.” Prioritize foods served on a stick, which are the ultimate one-handed meal. Think savory pork BBQ, isaw (chicken intestines), or local sausages like Chorizo de Cebu. Empanadas or ‘puso’ (hanging rice encased in woven coconut leaves) are also excellent choices that don’t require utensils or a table. Avoid soupy dishes like batchoy or anything that requires two hands and your full attention, as this makes you a vulnerable target for both pickpockets and accidental bumps.
Food safety is paramount amidst the chaos. Your eyes are your best tool. Look for vendors grilling food over live coals right in front of you. The intense heat is a good sign of safety. Be wary of pre-cooked items that have been sitting out. When it comes to hydration, stick to sealed bottled water or canned sodas. If you want to try a local custom, the “soda in a plastic bag with a straw” is generally safe, but inspect the source of the ice if any is used. Your goal is to fuel up for the photographic marathon without losing a single shooting opportunity or a day of your trip to illness.
When to Arrive on the Parade Route to Get a Front Row Spot?
The Grand Street Parade is the heart of the fiesta, a miles-long river of faith, color, and motion. Getting a front-row spot is the holy grail for any photographer, but it’s a prize earned through strategy, not luck. Simply showing up when the parade starts is a guarantee of shooting over a thousand heads. To capture those clean, powerful, eye-level shots, you need to think like a military strategist, understanding the terrain and timing your movements with precision.
The official parade schedules, which note that the Grand Street Parade starts at 8-9 AM, are your starting point, not your arrival time. The real action for a photographer begins in the pre-dawn hours. Arriving at the staging areas around 5:00 AM allows you to capture the intimate, behind-the-scenes moments: dancers applying makeup under a single lightbulb, the quiet prayer before the chaos, and the final adjustments to magnificent costumes. This is where you’ll find unguarded emotion and incredible detail shots.
Once the parade begins, your location strategy must adapt. The judging areas are hotspots for peak-energy performances, as contingents give their all for the judges. This is where you’ll capture the most dynamic and polished choreography. However, as the day wears on and the sun beats down, the side streets become a refuge and an opportunity. Here you can find candid moments of performers resting, rehydrating, and sharing a laugh, revealing the human side of the spectacle. Finally, positioning yourself near the end of the route during the golden hour yields shots of exhausted triumph, faces streaked with sweat and paint, glowing in the warm afternoon light.
The following guide provides a strategic timeline for a photographer on parade day.
| Time | Location Strategy | Photography Opportunity |
|---|---|---|
| 5:00 AM | Pre-dawn staging areas | Dancers applying makeup, costume preparation |
| 7:00 AM | Near judging areas | Peak energy performances, best lighting |
| 8-9:00 AM | Main parade route start | Grand Street Parade begins |
| 1:00 PM | Side streets | Candid moments of resting performers |
| 4:00 PM | End of parade route | Exhausted triumph shots, golden hour light |
When to Visit Panagbenga to See the Flower Floats in Full Bloom?
Unlike the frenetic energy of Sinulog, Baguio’s Panagbenga Festival offers a different kind of visual feast: the breathtaking beauty of its giant floral floats. Photographing these ephemeral masterpieces requires a different tactical approach. The challenge isn’t navigating paint-wielding crowds, but capturing the intricate artistry of the floats before they are wilted by the sun or obscured by spectators. Again, timing is everything.
The main Float Parade is the star event, but as with Sinulog, the best photographic opportunities lie on the fringes of the official schedule. The single most valuable tip for photographers is to visit the float assembly area, typically at the Baguio Athletic Bowl, on the evening before the parade. Under the cool night air and artificial lights, you have unparalleled, crowd-free access to the floats. This is your chance to shoot macro details of the flowers, capture the immense scale of the creations, and document the final touches being made by the artists.
On parade day itself, an early start is non-negotiable. Arriving at 5:00 AM allows you to capture the floats in the soft, magical light of dawn. This is often the only time you’ll be able to photograph them without a sea of people in the foreground. Once the parade is over, your work isn’t done. Many of the winning floats are put on a multi-day static exhibition. This is the perfect opportunity to return and shoot them again during the golden and blue hours, capturing them in different lighting conditions and from every conceivable angle, without the pressure and rush of the parade itself.
Fiesta vs. Daily Life: How Does the Vibe Change in Rural Barangays?
The grand parades in the city centers are only one facet of the fiesta. For a photographer seeking a deeper narrative, the real story often unfolds in the smaller, rural barangays (villages). Here, the transformation from quiet daily life to explosive 24/7 celebration is stark and incredibly photogenic. Capturing this “before and after” provides a powerful photo essay that speaks volumes about the Filipino spirit of community and joyful resilience.
The key is to create a deliberate framework for your photo essay. Begin by documenting a specific location—a quiet street corner, a local basketball court, the humble chapel—a week before the fiesta. Capture the scenes of daily life: children playing, elders chatting on a porch, the slow, peaceful rhythm of the province. Record the ambient sounds: the crowing of roosters, the gentle hum of tricycles. This is your baseline, the “before.”
Then, return to that exact same spot during the height of the fiesta. Frame the exact same shot. The once-quiet street corner is now a teeming mass of people, the basketball court has been transformed into an open-air disco, and the chapel is overflowing with devotees. The soundscape has shifted from roosters to the relentless beat of sound systems and the cheerful cacophony of 24/7 videoke sessions. By capturing these identical frames, you create a powerful visual comparison that highlights the incredible transformation of public and private spaces, telling a story of how an entire community puts daily life on hold to collectively celebrate faith and life itself.
Key Takeaways
- Logistical Mastery First: Your best festival shots are born from planning done months in advance, especially for accommodation and transport.
- Proactive Gear Defense: Don’t just protect your camera, create a system with rain covers and decoy clothing to actively manage the risks of paint and crowds.
- Timing is Everything: The best photo opportunities are often outside of peak parade times—in the pre-dawn preparations and the quiet moments on the side streets.
How to Perform “Mano Po” to Show Respect to Filipino Elders?
In your quest for the perfect shot, you may be invited into a home or a more intimate family gathering. Here, the camera takes a backseat to culture. The most important gesture you can learn is not a photographic technique, but a cultural one: the “Mano Po.” This beautiful act of respect shown to elders is a cornerstone of Filipino culture. Understanding and performing it correctly shows that you are not just a tourist with a camera, but a respectful guest.
The gesture is simple and graceful. You gently take the elder’s hand and bring the back of it to your forehead. It is a non-verbal request for a blessing and a sign of deep respect. The appropriate response from the elder is often a nod and a blessing, like “God bless you.” As a visitor, this is typically done when you are formally introduced to family elders in a home setting. It is not something you would typically do to a stranger on the street; a respectful nod and using the honorifics “po” and “opo” in conversation is more appropriate in public encounters.
As a photographer, knowing when to put the camera down is as important as knowing when to raise it. The “Mano Po” is an intimate moment. While you might capture it from a respectful distance in a documentary style, you should never photograph it up close without permission, and you should certainly put your camera away when you are the one performing the gesture. As photographer Brendan van Son notes in his guide to shooting in Manila:
In The Philippines the smiles almost always come along with the photos… any time I want to put my camera in someone’s face, I’ll ask permission first
– Brendan van Son, Street Photography in Manila Guide
By shifting your focus from f-stops to fiesta-flow, from gear to gestures, you arm yourself with the true tools of a great festival photographer. You’re now ready to move beyond just taking pictures and start capturing the soul of the celebration.
Frequently Asked Questions about Philippine Fiesta Photography
When should photographers document vs. participate in Mano Po?
Photograph from a respectful distance using candid techniques, but put the camera down when directly interacting with elders or in intimate family settings.
What’s the appropriate response after receiving an elder’s blessing?
Respond with a warm smile and quiet ‘Thank you, po’ to complete the respectful interaction.
When is Mano Po appropriate for visitors?
It’s typically for family or elders you’ve been formally introduced to in home settings. For street encounters, a respectful nod with ‘po’ in greeting is more appropriate.