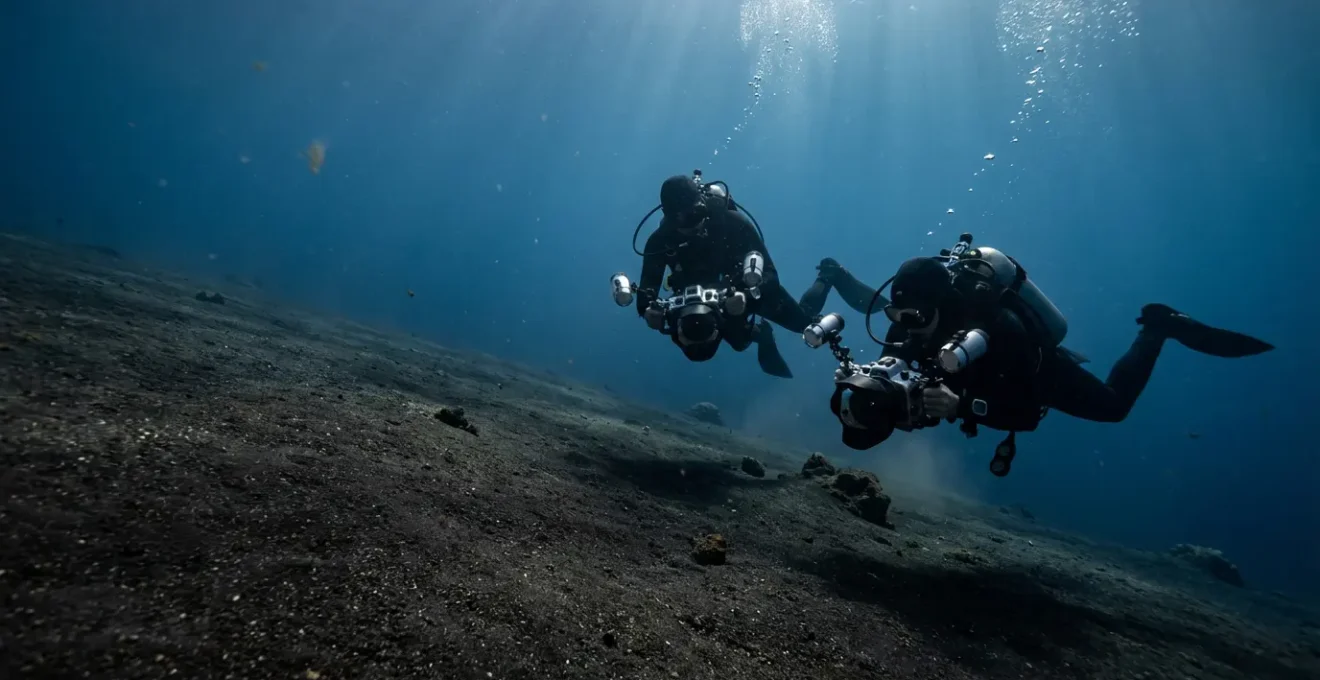
For serious underwater photographers, the choice between Anilao and Dauin is just the beginning. The real challenge lies in mastering the complex on-the-ground logistics of a Philippine dive expedition. This guide moves beyond destination comparisons to provide a technical deep-dive into crucial operational planning, from high-end camera rentals and navigating variable dive fees to advanced safety protocols and ethical wildlife encounters, ensuring your trip is a success before you even hit the water.
The debate among underwater macro photographers often boils down to a single question: Anilao or Dauin? Both are rightfully hailed as world-class muck diving capitals, teeming with the rare and bizarre critters that fill memory cards. But focusing solely on which destination has more frogfish or ghost pipefish is a rookie mistake. That decision, while important, is only the first step in a much more complex operational plan. A successful photographic expedition in the Philippines is won or lost long before you descend.
Experienced photographers know that the true differentiators of a productive trip are found in the details: navigating gear rentals in a bustling city like Manila, understanding the vast differences in marine park fees between regions, and knowing the unwritten rules of ethical photography with sensitive species. It’s about managing your nitrogen load for a safe flight home after a week of deep wreck diving and timing your entries to avoid crowds and capture pristine animal behavior. These are the logistical hurdles that separate a frustrating trip from a portfolio-defining one.
This guide is built for the photographer who has already decided on the Philippines and now needs to execute. We will shift the focus from the ‘where’ to the ‘how,’ providing a technical framework for navigating the critical operational challenges of a high-level dive trip in the archipelago. From pre-trip gear strategy to post-dive safety, mastering these elements is the key to unlocking the full photographic potential of the Philippines.
This article provides a technical breakdown of the key logistical considerations for any serious dive trip in the Philippines. The following sections address the most common and critical questions that professional and advanced photographers face when planning their expedition.
Summary: A Technical Guide to Diving in the Philippines
- How to Rent High-End Underwater Cameras in Manila Before Your Trip?
- Why Do Dive Fees Vary So Much Between Palawan and Visayas?
- The Mistake of Using Strobes When Diving Monad Shoal
- How to Plan Your Flight Home After a Heavy Dive Week in Coron?
- When to Dive Moalboal to Avoid the Crowds of Snorkelers?
- How to Complete Your Open Water Course in 3 Days in Boracay?
- When to Visit Donsol to See Whale Sharks Naturally Migrating?
- Tubbataha vs. Coron Wrecks: Which Dive Trip Is Worth the Premium Price?
How to Rent High-End Underwater Cameras in Manila Before Your Trip?
Arriving in a remote dive location only to discover a gear malfunction is a photographer’s worst nightmare. For a complex expedition, renting a high-end setup or specialized accessories in Manila before heading to your final destination is a sound strategic decision. This approach mitigates the risk of equipment failure and allows you to test everything in a controlled environment. Manila-based rental shops offer access to specialized gear like snoots, high-magnification wet lenses, and specific strobe models that may not be available at smaller, island-based resorts.
The key is to treat rental as part of your pre-expedition checkout. Plan to pick up the gear at least two days before your first dive. This buffer is crucial for familiarizing yourself with the controls, programming custom functions, and performing a pre-trip pool test to check all seals and electronic connections. When negotiating the rental, insist on reviewing the flooding liability clauses in the agreement. Understanding your financial exposure in a worst-case scenario is non-negotiable. According to Philippines dive resorts offering equipment rental, daily rental rates for camera systems can range from $50-150 USD, often with significant weekly discounts that make it a viable option.
Furthermore, understanding the insurance landscape is critical. Your standard travel insurance may not cover high-value rental equipment, especially in the case of flooding. Discussing options directly with the rental shop is paramount.
| Insurance Type | Coverage | Cost | Flooding Protection |
|---|---|---|---|
| Rental Shop Insurance | Full replacement value | 15-20% of rental | Yes, with $500-1000 deductible |
| Travel Insurance Rider | Up to $5,000 equipment | $30-50 per trip | Limited, check policy |
| Credit Card Coverage | Secondary coverage only | Free with premium cards | Usually excluded |
Ultimately, renting gear in a major hub like Manila transforms a potential liability into a strategic advantage, ensuring you arrive at your primary dive location with tested, reliable, and appropriate equipment for the job.
Why Do Dive Fees Vary So Much Between Palawan and Visayas?
One of the most common points of confusion for divers planning a multi-location trip in the Philippines is the dramatic variance in marine park and dive fees. A day of diving in the Visayas might involve a small local fee, while a trip to Palawan’s premier sites can carry a price tag that is orders of magnitude higher. This isn’t arbitrary pricing; it’s a direct reflection of the fee-to-conservation ratio and the operational scale of the protected area.
The quintessential example is the Tubbataha Reefs Natural Park in Palawan. As a UNESCO World Heritage site covering a massive 96,828 hectares, its conservation demands are immense. The hefty park fees, which can be up to $200 USD per trip plus fuel surcharges, directly fund a network of ranger stations, anti-poaching patrol boats, and ongoing scientific research necessary to protect this isolated and pristine ecosystem. Without these fees, the park simply couldn’t survive.
In contrast, many marine sanctuaries in the Visayas, such as those around Dauin or Apo Island, operate on a much smaller, community-based model. Their success relies on local stakeholder involvement, with more modest infrastructure and staffing. Consequently, the daily fees are lower because the operational overhead is smaller. The case study below highlights this fundamental difference in management and funding structure.
Case Study: Fee Allocation in Tubbataha vs. Local Marine Parks
Tubbataha’s UNESCO World Heritage status requires extensive conservation funding, with fees supporting ranger stations, research programs, and patrol boats. In contrast, smaller Visayan marine sanctuaries like Apo Island operate with minimal staff and infrastructure, allowing lower daily fees while still maintaining healthy reef systems through community-based management. This demonstrates a direct link between the scale of conservation operations and the cost passed on to the diver.
Therefore, when evaluating dive costs, it’s crucial to look beyond the price tag and consider what you are investing in. The higher fees in places like Tubbataha are not just for access; they are a direct contribution to the preservation of some of the most vital marine biodiversity on the planet.
The Mistake of Using Strobes When Diving Monad Shoal
Monad Shoal, off the coast of Malapascua, is world-famous as the most reliable place to encounter pelagic thresher sharks. For a photographer, this presents a bucket-list opportunity. However, it also presents a critical test of ethics and advanced technique. The biggest mistake a photographer can make here is approaching the dive with a standard “strobe-forward” mentality. The use of artificial light at this specific site is not just poor form; it’s detrimental to the animals and the long-term viability of the encounter.
The thresher sharks come to Monad Shoal at dawn to visit “cleaning stations,” where small wrasse remove parasites from their skin, gills, and even inside their mouths. This is a sensitive, natural behavior. The sharks’ enormous eyes, adapted for hunting in deep, dark water, are extremely sensitive to bright flashes. As the Thresher Shark Research and Conservation Project notes in their guidelines:
The thresher sharks’ large eyes are extremely sensitive to artificial light, which disrupts their cleaning station behavior and can cause them to abandon the site entirely.
– Thresher Shark Research and Conservation Project, Marine Biology Conservation Guidelines
This is the core of the ethical-technical boundary. A professional understands that getting the shot cannot come at the expense of the subject’s welfare. The challenge, therefore, becomes one of technique: how to capture a compelling image in low-light, deep-water conditions without strobes.
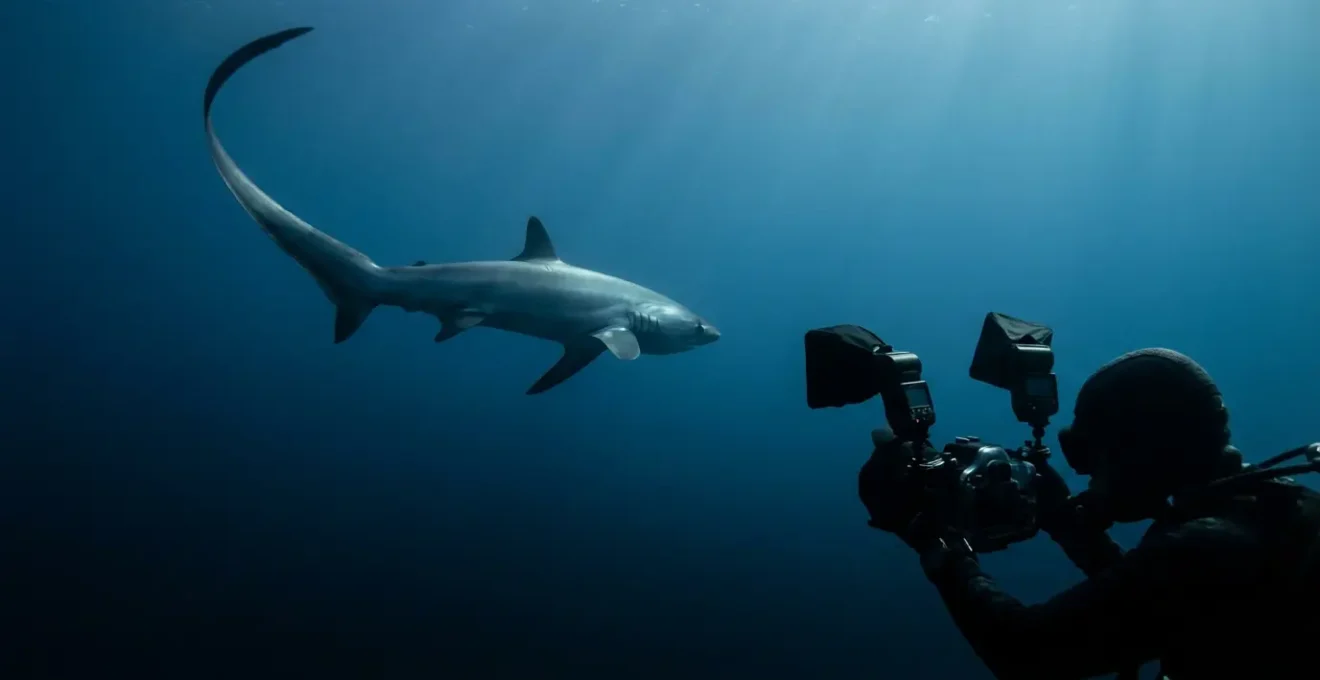
This is where mastery of natural light photography comes into play. The goal is not a perfectly lit-up portrait but a powerful silhouette or ambient light shot that captures the mood and majesty of the pre-dawn encounter. This involves using a high ISO, a wide-open aperture (f/2.8 or lower), and focusing on capturing the elegant shape of the shark’s iconic tail against the deep blue. Success at Monad Shoal isn’t measured by the brightness of your image, but by the respect shown to the animals.
How to Plan Your Flight Home After a Heavy Dive Week in Coron?
After a week of penetrating the historic WWII wrecks of Coron Bay, your logbook is full, but your body is saturated with nitrogen. This is where the discipline of nitrogen load management becomes a critical safety issue. Standard no-fly time recommendations are often insufficient for the type of diving typical in Coron, which frequently involves multiple deep, square-profile dives over several consecutive days. A more conservative approach is not just recommended; it’s essential.
The standard 18-hour surface interval before flying is a baseline designed for recreational, no-decompression diving. However, according to technical diving safety protocols, divers doing multiple 30+ meter wreck dives should wait 24-36 hours before flying. This extended period is necessary to allow for more complete off-gassing of nitrogen from slower-saturating tissues. Ignoring this can significantly increase the risk of decompression sickness (DCS), even if you have remained within your computer’s limits on every dive.
A smart flight plan involves building this buffer day into your itinerary from the start. Instead of treating it as a wasted day, use it to explore Coron’s topside attractions. A visit to the Maquinit Hot Springs in the morning can be a relaxing way to spend your surface interval, followed by a late afternoon hike up Mt. Tapyas for a sunset view. This not only ensures your safety but also enriches your travel experience. Using Nitrox for all your dives throughout the week can also help reduce overall nitrogen loading, but it does not eliminate the need for a conservative pre-flight surface interval.
Your Pre-Flight Safety Checklist: Coron Wreck Week
- Check your dive computer’s tissue saturation graph after your final wreck penetration dive to assess your nitrogen load.
- Add a minimum of 24 hours to the standard 18-hour no-fly time for repetitive, deep wreck dives; extend to 36 hours if any deco stops were made.
- Plan a full surface interval day with non-strenuous topside activities like the Maquinit Hot Springs and the Mt. Tapyas hike.
- Book a commercial flight from Busuanga (USU) on a carrier like Philippine Airlines or Cebu Pacific to ensure a properly pressurized cabin, avoiding small charter planes.
- Consider using Enriched Air Nitrox throughout the week to reduce your cumulative nitrogen exposure, but do not use it as a substitute for an extended surface interval.
Properly planning your departure is the final, and most important, step of a safe and successful wreck diving expedition. It’s an undebatable part of your dive plan.
When to Dive Moalboal to Avoid the Crowds of Snorkelers?
Moalboal’s main attraction, the massive sardine ball at Panagsama Beach, is a truly world-class spectacle. Millions of fish move as a single, shimmering entity, creating breathtaking patterns. However, its easy accessibility from the shore means that by mid-morning, the site can be crowded with snorkelers and freedivers, their fins and bodies disrupting the natural behavior of the school and cluttering up potential compositions. For a photographer, getting a clean, impactful shot requires a specific strategy: timing.
The key to an empty ocean and natural sardine behavior is to dive at dawn. Being in the water by 6 AM, just as the sun is rising, allows you to experience the sardine ball before anyone else arrives. This is not just about avoiding people; it’s about capturing a better image. The low-angle morning light penetrates the water, creating dramatic sun-rays that slice through the school, and the fish are often more tightly packed and active in the early hours.
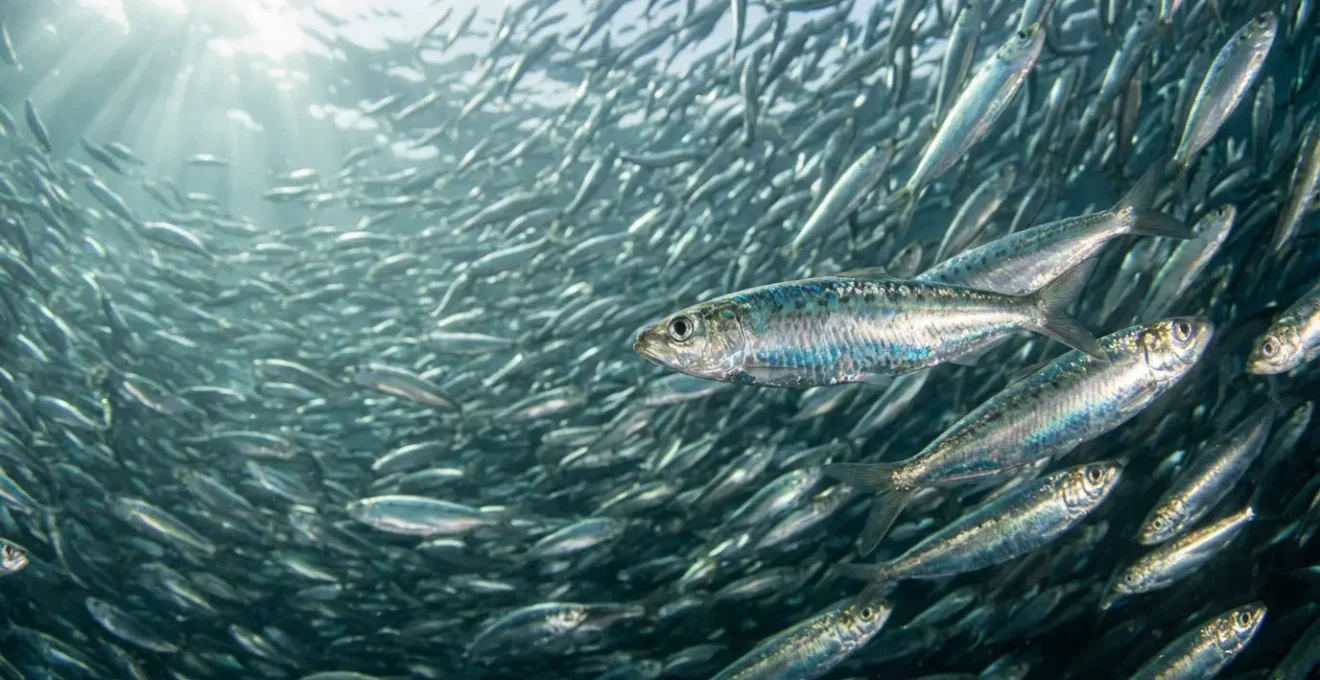
Beyond just the time of day, tidal movements play a crucial role. A smart photographer will align their dive with the local tide charts for optimal conditions.
Case Study: Tidal Timing Strategy for Underwater Photographers
Photographers diving Panagsama Beach at 6 AM during an incoming high tide report significantly better visibility and more natural sardine behavior compared to midday dives. The sardine ball positions itself 5-10 meters closer to shore during high tide, allowing for better ambient light penetration and eliminating the need for powerful strobes that can scatter the school. This strategy results in cleaner backgrounds and more dynamic compositions.
By combining an early morning start with favorable tidal conditions, a photographer can transform a potentially chaotic and frustrating dive into a serene and highly productive session. It’s a simple logistical adjustment that yields massively disproportionate results in the quality of the final images.
How to Complete Your Open Water Course in 3 Days in Boracay?
While this guide focuses on advanced photographers, a common logistical challenge is traveling with a partner, family member, or friend who needs to get certified. Boracay, with its calm, shallow, and protected waters, is an excellent and efficient place to complete an Open Water course. The key to compressing the certification into just three days lies in front-loading the academic portion using eLearning.
The traditional course dedicates significant time to classroom sessions and knowledge reviews. By completing all the PADI or SSI eLearning modules—including videos, quizzes, and the final exam—before even arriving in the Philippines, the student can dedicate their on-island time almost exclusively to in-water skills. This pre-arrival study typically takes 5-8 hours but is the single most effective step in accelerating the practical training schedule.
Once in Boracay, the course follows a streamlined, practical-focused agenda:
- Day 0 (Pre-arrival): Complete 100% of the eLearning modules and pass the online final exam.
- Day 1: A morning session in confined water (like a pool or a calm, shallow beach area) to practice fundamental skills, followed by Open Water dives 1 and 2 in the afternoon at a simple site like Angol Point.
- Day 2: Morning dives 3 and 4 to complete all required skills, often at a slightly more dynamic site like Crocodile Island. The afternoon is for reviewing any challenging skills.
- Day 3: A final skills assessment and often a “fun dive” to a site like the Camia Wreck, allowing the newly certified diver to enjoy their first real dive without the pressure of training.
The choice of training location on the island itself is dictated by the season and prevailing winds.
| Season | Best Training Beach | Conditions | Visibility |
|---|---|---|---|
| Amihan (Nov-Apr) | Bulabog Beach | Calm, protected | 10-15m |
| Habagat (May-Oct) | White Beach Station 3 | Sheltered bays | 8-12m |
This efficient structure allows a non-diving partner to quickly gain the certification needed to join you on appropriate dives for the rest of your trip, turning a logistical problem into a shared experience.
When to Visit Donsol to See Whale Sharks Naturally Migrating?
Donsol built its reputation on offering one of the most ethical and natural whale shark encounters in the world. Unlike other locations where the animals are fed, the whale sharks in Donsol are there as part of their natural migration, following plankton blooms. For photographers and conservation-minded tourists, this is a massive draw. The peak season has traditionally been from February to May, when nutrient-rich waters create the perfect feeding ground.
The science behind this timing is linked to a specific ecological chain of events. Research has shown that the discharge from the Donsol River, combined with seasonal changes in water temperature and silicate levels, triggers blooms of diatoms (a type of phytoplankton). This is the primary food source that attracts the whale sharks. Understanding this plankton-driven migration is key to grasping why the encounters are seasonal and entirely dependent on natural environmental factors.
Plankton Bloom Patterns and Whale Shark Presence
Research from 2017-2018 in the area showed that dinoflagellates dominate during the off-season (September-November), while diatoms—the whale sharks’ preferred food source—increase dramatically during the peak season (February-May). Water temperature and silicate levels are the key predictors, with the Donsol River’s discharge creating the nutrient-rich conditions that trigger these specific plankton blooms.
However, it is critically important for any visitor to have realistic and up-to-date expectations. Natural patterns are subject to change, and recent environmental shifts have impacted the reliability of sightings. Relying on outdated information can lead to disappointment. As local operators have noted, the situation on the ground has evolved.
In 2024, whale shark sightings in Donsol have dropped to around 1-2 individuals every few days, even during peak months, due to environmental changes affecting migration patterns.
– Local Donsol Dive Operators, Where and Wander Travel Report
While Donsol remains a benchmark for ethical tourism, photographers and visitors must plan their trip with the understanding that sightings are a privilege, not a guarantee. The experience is about witnessing a wild, natural migration, and that comes with inherent unpredictability.
Key Takeaways
- Operational Readiness is Paramount: A successful trip depends less on the destination and more on mastering logistics like pre-trip gear rental and insurance.
- Ethics and Technique are Inseparable: The best shots come from respecting wildlife, such as using natural light with sensitive species like thresher sharks.
- Safety Protocols are Non-Negotiable: Advanced diving requires advanced safety planning, especially conservative no-fly times after repetitive deep dives.
Tubbataha vs. Coron Wrecks: Which Dive Trip Is Worth the Premium Price?
For photographers ready to invest in a premium, specialized trip in the Philippines, the choice often comes down to two titans: the pristine reefs of Tubbataha or the historic wrecks of Coron. Both require a significant financial and time commitment, and both offer world-class, but fundamentally different, photographic opportunities. The decision of which is “worth it” depends entirely on your photographic goals and budget. A direct cost analysis reveals the stark financial differences.
Tubbataha is almost exclusively accessed via liveaboard, which entails a higher upfront cost. Coron, while also accessible by liveaboard, is primarily a land-based operation, which generally offers a lower total cost. Breaking down the cost per dive is a useful metric for comparison.
| Factor | Tubbataha (7 nights) | Coron (7 days) |
|---|---|---|
| Total Cost | €1,960-3,500 | €800-1,500 |
| Dives Included | 18-21 dives | 14-20 dives |
| Cost per Dive | €93-166 | €40-107 |
| Unique Experiences | Pristine reefs, pelagics | WWII wrecks, penetration |
| Park Fees | $120-200 additional | Included in dive fees |
Beyond the numbers, the value proposition of each destination lies in its unique character. This is not a choice between good and bad, but between two different genres of underwater photography. As described by one leading operator, the distinction is clear:
Tubbataha represents unparalleled biodiversity and pristine reefscapes (‘Nature’s Capital’), while Coron offers historical significance and technical wreck penetration (‘Historical Capital’).
– Master Liveaboards, Philippines Itinerary Guide
Ultimately, the “premium price” is justified in both cases, but only if the experience aligns with your objectives. Are you seeking vibrant, wide-angle reef scenes teeming with sharks and turtles? Tubbataha is your answer. Are you drawn to the challenge of lighting vast, historic metal structures and capturing the moody ambiance of wreck penetration? Then Coron is the superior investment. The right choice is the one that best serves your portfolio.
By applying this technical and logistical mindset to your planning, whether you choose Anilao, Dauin, Coron, or Tubbataha, you move beyond being a tourist and become the director of your own successful photographic expedition. The next step is to start building your own operational plan based on these principles.