Choosing between Mt. Pulag and Mt. Ulap isn’t about which is “easier,” but which high-altitude classroom best suits your current fitness and mental preparedness.
- Mt. Pulag (Ambangeg Trail) is a masterclass in altitude acclimatization and cold weather management, testing your endurance over a longer, gradual ascent.
- Mt. Ulap is a rigorous test of leg strength, balance, and heat endurance, featuring steep, exposed ridges and a demanding descent.
Recommendation: Honestly assess your weakness. If it’s cardio and cold tolerance, train for Pulag. If it’s leg strength and technical descent, prepare for Ulap.
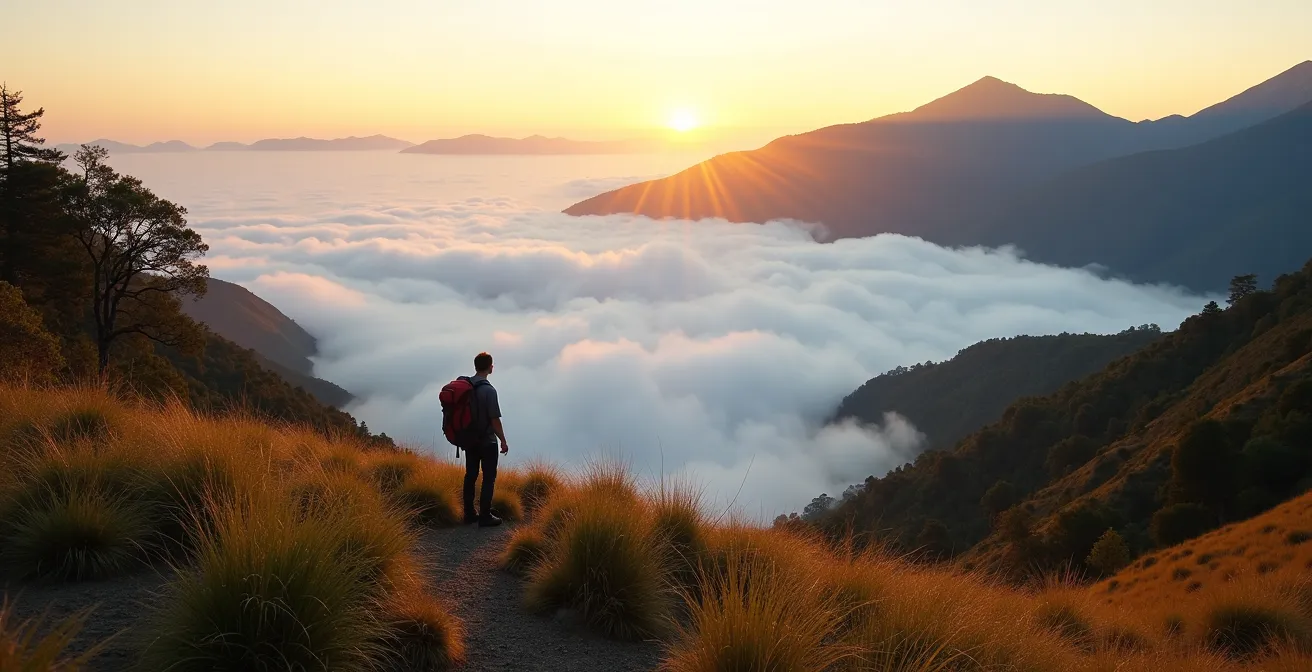
The image is iconic: a vast sea of clouds unfurling beneath a mountain summit at sunrise. For many aspiring hikers in the Philippines, this is the ultimate goal, and two names immediately come to mind: Mt. Pulag and Mt. Ulap. The internet is filled with comparisons of their stats—difficulty ratings, elevation, trail length. But this data-driven approach often misses the most critical point for a novice. As an instructor, I’ve seen beginners succeed and fail on both peaks, and the reason is rarely the mountain’s raw statistics.
The common mistake is to see these mountains as items on a checklist. The real question isn’t just “which one can I conquer?” but “which one will teach me the right lessons to become a better, safer mountaineer?” The truth is, Mt. Pulag and Mt. Ulap are two very different classrooms. One teaches you how to manage the silent, creeping dangers of cold and altitude. The other is a brutal, honest lesson in muscular endurance and technical skill under the tropical sun. Choosing the right one for your first major “sea of clouds” experience depends on a candid self-assessment of your physical and mental readiness.
This guide will reframe the debate. We won’t just compare numbers. We will dissect the unique physiological and psychological challenges each mountain presents. We’ll analyze the critical safety protocols that are non-negotiable in the Philippine context, from dealing with leeches to understanding why a local guide is your most essential piece of gear. By the end, you won’t just know which mountain to pick; you’ll know *why* you’re picking it and how to prepare for the specific “final exam” it has in store for you.
In this comprehensive analysis, we will break down the essential knowledge every beginner needs. From decoding local mountaineering ratings to preparing for a pre-dawn summit assault, we’ll equip you with the strategic mindset of a seasoned climber.
Summary: Your Guide to the Sea of Clouds Classroom
- How to Remove a Limatik (Leech) Without Causing Infection?
- Why Is a Local Guide Mandatory for Almost Every Hike in the Philippines?
- The “It’s Tropical” Mistake That Causes Hypothermia on Mountain Peaks
- When to Start Your Trek to Catch the Sunrise at the Summit?
- Major Climb vs. Minor Climb: Decoding Philippine Mountaineering Ratings
- Banaue vs. Batad: Which Rice Terraces Are Worth the Trek?
- How to prepare for the summit of the highest peak in the country?
- Why Is the Philippine Tarsier So Sensitive to Noise and Flash?
How to Remove a Limatik (Leech) Without Causing Infection?
Alright team, let’s address the elephant in the room—or rather, the leech on your leg. On trails like Mt. Pulag’s mossy Tawangan path, nicknamed the ‘Bloody Trail’, encountering a *limatik* (forest leech) is a real possibility. Panic is your enemy. Pulling it off forcefully is a rookie mistake that can cause the leech to regurgitate bacteria into the wound or leave its mouthparts embedded, leading to infection. Your first test on the mountain isn’t one of strength, but of calm, deliberate procedure.
Think of it as a field-level medical task. The goal is to get the leech to detach on its own terms. The most effective method is to break its suction seal. You don’t need fancy sprays or ancient folklore involving salt or fire, which can cause the leech to vomit into your bloodstream. All you need is a firm, flat edge and a steady hand. Local guides often use traditional tobacco-based repellents as a deterrent, but knowing the removal technique is a core skill.
Wearing light-colored clothing can help you spot them faster, and tucking your pants into your socks is a simple but effective barrier. But when one gets through, executing the removal correctly is a mark of a prepared hiker.
Your Action Plan: Safe Leech Removal Protocol
- Stay Calm & Assess: Do not pull or squeeze the leech’s body. This is the most critical step to prevent infection.
- Break the Seal: Use a fingernail, credit card edge, or the flat side of a knife. Slide it right against your skin, under the leech’s smaller, biting end (the oral sucker).
- Push Sideways: Gently but firmly push sideways. This will break its suction, and the leech will detach without trauma.
- Clean and Disinfect: Immediately clean the small wound with an antiseptic wipe or soap and water from your kit.
- Manage Bleeding & Monitor: Apply pressure with clean gauze. The leech’s anticoagulant means it might bleed for 10-20 minutes. Over the next 48 hours, keep an eye on the site for signs of infection like excessive redness, swelling, or pus.
Why Is a Local Guide Mandatory for Almost Every Hike in the Philippines?
For hikers accustomed to the well-marked, state-funded trails of North America or Europe, the mandatory guide system in the Philippines can seem perplexing. It’s not a suggestion; at places like Mt. Pulag’s Babalak Ranger Station, it’s a strictly enforced rule for everyone, regardless of experience. This isn’t about creating jobs; it’s about a fundamental difference in the nature of the trails and a deep-seated philosophy of safety and community responsibility.
As the Project Gora Travel Guide wisely points out, “Pulag’s trails differ from well-marked paths in places like Taiwan, South Korea, or Japan; instead, they are community trails leading to diverse locations, making a guide essential for navigation.” These are not purpose-built recreational paths. They are a complex web of trails used by locals for farming, foraging, and visiting neighboring villages. A wrong turn doesn’t just lead you to a dead end; it could lead you into a completely different valley, hours away from your intended route. Add in the notoriously unpredictable mountain weather, and the guide’s local knowledge of microclimates and shelter spots becomes your primary safety net.
Furthermore, guides are the frontline of conservation and capacity management. For instance, the DENR strictly limits Mt. Pulag access to 500 visitors per day maximum. The guides are instrumental in enforcing these rules, minimizing hiker impact, and ensuring the fragile ecosystem can recover. Hiring a guide is an act of respect—for the mountain’s dangers, the local community’s ancestral lands, and the preservation of the natural beauty you’ve come to witness.
The “It’s Tropical” Mistake That Causes Hypothermia on Mountain Peaks
This is arguably the most dangerous—and most common—failure point for beginners in the Philippines. You pack for a tropical country, thinking a simple hoodie will suffice. But the summit of a mountain like Pulag is a completely different world. The mountaineering adage “Cotton Kills” is a lesson many learn the hard way here. When you sweat during the ascent, a cotton shirt or denim jeans absorb that moisture and hold it against your skin like a sponge.
At the base, it’s just uncomfortable. But at the summit, where the wind howls and temperatures can plummet, this becomes a critical danger. That wet fabric instantly begins to sap your body heat, accelerating the onset of hypothermia far faster than the cold air alone. It’s a chillingly efficient process. Even with a thick jacket over it, the wet inner layer will continue to drain your core temperature. A study of Mt. Pulag shows it can experience extreme temperature drops to -5°C to 15°C (23°F to 59°F). When you’re wet, a 5°C temperature with high wind can feel like deep-freeze conditions.
The solution is layering with synthetic, moisture-wicking fabrics. A quick-dry base layer, a fleece mid-layer for insulation, and a waterproof/windproof outer shell. This system works by moving sweat away from your body and keeping external moisture out. You can add or remove layers to manage your temperature perfectly during exertion and rest. Ditching cotton isn’t a suggestion; it’s the first rule of thermoregulation and your best defense against the mountain’s most insidious threat.
When to Start Your Trek to Catch the Sunrise at the Summit?
Witnessing the sunrise over a sea of clouds is the grand prize, but it’s not an event you can be fashionably late for. The magic window is short, and timing your ascent is a strategic calculation, not a guess. Simply starting when everyone else does might not work for your pace. The key is to use a method of reverse calculation, starting from the desired outcome and working backward. This is your first real test of logistical planning as a mountaineer.
The average sunrise is between 5:30 AM and 6:00 AM. For the popular Ambangeg Trail on Mt. Pulag, the trek from the ranger station to the summit takes an average of 4-5 hours for a person of moderate fitness. But “average” is a dangerous word on a mountain. You need to factor in your own fitness, potential delays, and a crucial buffer to not just *be* at the summit, but to be there early enough to find a good spot, set up your camera, and actually enjoy the moment without rushing. You also want to arrive during the “blue hour,” the magical pre-dawn period when the sky is a deep, rich blue, which often provides more stunning photos than the sunrise itself.
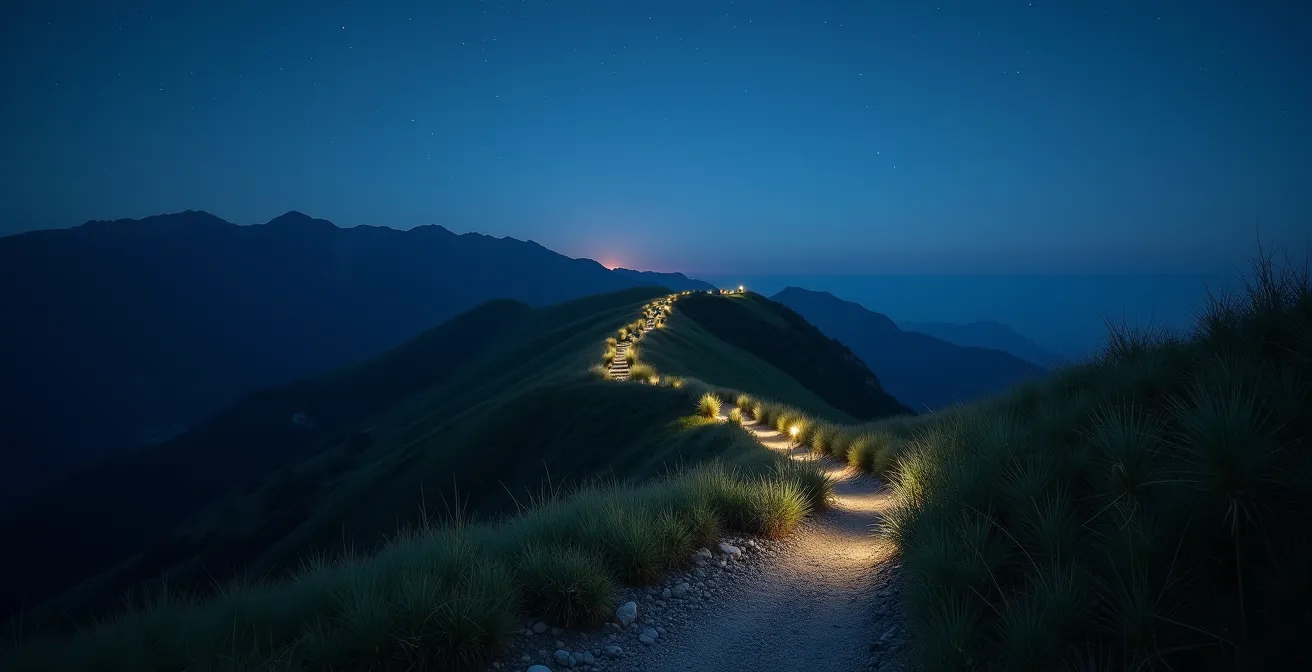
As the image shows, the summit assault begins in complete darkness, guided only by the small beam of your headlamp. This pre-dawn push is a core part of the experience, a quiet, meditative journey before the day’s spectacle. Calculating your start time correctly transforms the experience from a frantic race against the sun into a well-executed plan where you are in control.
Checklist: Your Summit Sunrise Timing Plan
- Confirm Sunrise Time: Check the official sunrise time for your specific hiking date (e.g., 5:45 AM).
- Estimate Your Trek Time: Be honest about your fitness. For Ambangeg, budget 4-5 hours. For Ulap, it’s part of a traverse, so timing is different.
- Add the Summit Buffer: Add at least 30 minutes to arrive, catch your breath, find a prime viewpoint, and prepare your gear before the main event.
- Factor in Your Contingency: Add a personal buffer. If you know you’re slower on inclines, add 20-30% to your estimated trek time.
- Include the “Blue Hour” Window: Add a final 45 minutes to ensure you arrive well before the first light for the best atmospheric conditions. A 5:45 AM sunrise means you want to be at the summit by 5:00 AM.
Major Climb vs. Minor Climb: Decoding Philippine Mountaineering Ratings
Here’s where many beginners get tripped up. Both Mt. Pulag’s Ambangeg trail and Mt. Ulap are often rated a 3/9 in difficulty. Seeing this, a novice might assume they are interchangeable. This is a critical misunderstanding of the Philippine mountaineering rating system. The number is just a starting point; it doesn’t tell the whole story about the *type* of challenge you will face. As an instructor, this is the most important distinction I teach: they are two entirely different exams.
Mt. Pulag (Ambangeg) is a test of endurance and physiological management. The trail is a long, gradual, and relatively non-technical ascent. The primary challenge isn’t the terrain under your feet; it’s the altitude (hypoxia) and the biting cold. Your body is fighting a battle against lower oxygen levels and temperature drop. Mt. Ulap, on the other hand, is a test of raw leg strength and technical balance. Its rolling ridges feature steep ascents and, more importantly, a punishingly steep, often slippery descent on red clay. The main challenge is muscular fatigue and the risk of slips and falls, often under direct sun exposure.
This subjective difference is why you’ll hear conflicting reports. As one experienced hiker notes in a guide to the mountains, “In my point of view, Mt. Ulap is more challenging compared to Mt. Pulag Ambangeg trail because of the steep descent and super exposed open trail.” This perspective is invaluable. It highlights that “difficulty” is personal and depends on your strengths. Are you better at long, steady cardio, or short bursts of power and balance?
| Aspect | Mt. Pulag (Ambangeg) | Mt. Ulap |
|---|---|---|
| Difficulty Rating | 3/9 | 3/9 |
| Elevation | 2,926 MASL | 1,846 MASL |
| Trek Duration | 4-6 hours to summit | 4-6 hours traverse |
| Distance | 9.3 miles round trip | 9.4 km traverse |
| Main Challenge | Altitude & cold (can reach -5°C) | Steep descent & sun exposure |
| Trail Type | Gradual incline, established path | Rolling ridges, steep red clay descent |
| Best For | Endurance & cold management | Leg strength & balance |
Banaue vs. Batad: Which Rice Terraces Are Worth the Trek?
Many hikers wisely combine their Cordillera mountain adventure with a visit to the region’s famous rice terraces. But just like with Pulag and Ulap, choosing between Banaue and Batad is a strategic decision that should align with your hiking plan. Viewing them as interchangeable tourist spots is a missed opportunity for either training or recovery.
Think of them this way: Batad is a pre-climb fitness test, while Banaue is a post-climb reward. Batad, a UNESCO World Heritage site, is an immersive amphitheater of terraces that you can only reach by a significant trek. The 1-2 hour hike involves a steep trail down into the valley and, more importantly, a grueling climb back out. This perfectly mimics the muscular demands of a mountain ascent/descent and serves as an excellent training hike to gauge your fitness before tackling a major peak.
Banaue’s viewpoints, on the other hand, are largely accessible by vehicle. They offer stunning panoramic vistas of the terraces (the ones famously pictured on the old 1,000-peso bill) with minimal physical effort. This makes them the perfect activity for the day after your Mt. Pulag descent, allowing your tired muscles to recover while you still soak in the breathtaking landscape of the Cordilleras. Planning your terrace visit strategically enhances your entire trip.
| Aspect | Banaue Viewpoints | Batad Rice Terraces |
|---|---|---|
| Access Difficulty | Easy – roadside viewpoints | Challenging – requires 1-2 hour trek |
| Physical Effort | Minimal – accessible by vehicle | Significant – steep trail down and up |
| Experience Type | Panoramic vista viewing | Immersive amphitheater experience |
| Best For | Post-climb relaxation | Pre-climb fitness test |
| Time Needed | 2-3 hours | Full day |
| Ideal Pairing | After Mt. Pulag descent | Training hike before major climb |
How to prepare for the summit of the highest peak in the country?
Whether you’re on Mt. Pulag or another major peak, the final push to the summit—often called the “summit assault”—is the final exam. It happens in the coldest, darkest hours and requires a specific set of gear that should be packed separately for quick access. This isn’t your main hiking pack; this is a smaller, lighter “go-bag” with only the essentials for the last, most critical leg of the journey. Preparation here is everything.
Your body is already under stress from the altitude and the early start. Proper acclimatization is key; for instance, the DENR often recommends spending 1-2 hours acclimatization at 2,300m (the ranger station) before the final ascent. Your summit pack should be designed to combat the two biggest threats at this stage: energy depletion and extreme cold. High-carbohydrate, easy-to-eat snacks are vital for a quick energy boost. Your water needs to be accessible and preferably in an insulated bottle to prevent it from getting unpleasantly icy or even freezing.
Your warmest layers, which may have been too hot to wear on the initial ascent, are now critical. This includes a down jacket, thermal gloves, and a bonnet or beanie to prevent heat loss from your head. Finally, your headlamp is your lifeline. Ensure it has fresh batteries, and always carry spares. A dead headlamp at 3 AM on a mountain trail is a situation you must never find yourself in.
Your Checklist: Summit Assault Pack Essentials
- Water (1 Liter): In an insulated bottle to prevent it from getting too cold to drink.
- High-Carb Snacks: Energy gels, chocolate, or hard candy for a quick and easily digestible fuel source.
- Headlamp & Spare Batteries: Your primary source of light is non-negotiable. Check it before you leave.
- Phone/Camera: Fully charged and kept in an inner pocket close to your body to preserve battery life in the cold.
- Warmest Layers: Your down or synthetic insulated jacket, thermal gloves, and a warm bonnet are mandatory.
- Windbreaker/Shell Jacket: The critical outer layer to block the wind, which is the main driver of wind chill.
Key takeaways
- Frame Your Choice: See Mt. Pulag and Mt. Ulap not as tourist spots, but as ‘classrooms’ teaching different high-altitude lessons (cold/altitude vs. strength/exposure).
- Master Physiological Challenges: The true difficulties are internal. Prioritize learning about thermoregulation (layering, avoiding cotton) and acclimatization over just trail stats.
- Respect as a Safety Tool: The mandatory guide system and environmental rules are non-negotiable safety protocols, not optional extras. Embracing them is part of being a responsible mountaineer.
Why Is the Philippine Tarsier So Sensitive to Noise and Flash?
At first glance, a question about a tiny primate from Bohol seems out of place in a guide to the Cordillera mountains. But as an instructor, I find the tarsier to be the perfect metaphor for the final and most important lesson in mountaineering: respect for fragility. The Philippine tarsier is a creature of extremes. Its enormous eyes, larger than its own brain, have no reflective layer, making a camera flash physically painful. Its hypersensitive hearing, evolved for nocturnal hunting, makes loud human voices an overwhelming sensory assault. They are known to become highly stressed and even suicidal in captivity due to this sensitivity.
The same principles of observation apply to a mountain ecosystem. The dwarf bamboo forests of Mt. Pulag’s summit are a unique and fragile environment, home to species found nowhere else. The trails you walk are not invincible; they are susceptible to erosion. The quiet of the pre-dawn hours is a vital part of the experience, both for you and the nocturnal creatures you might displace. Your trash, a sudden loud shout, or a step off the designated trail can cause damage that lasts for years.
As a conservation guide insightfully stated, “The same mindfulness required around a tarsier—quiet movement, no sudden flashes, keeping a respectful distance—is the same ethos a responsible hiker should apply to the fragile ecosystem of any mountain peak.” This is the pinnacle of mountaineering wisdom. The ultimate goal is not just to conquer the peak, but to pass through it with such care and respect that you leave it as pristine as you found it, preserving the magic for all who come after.
Now that you understand the unique challenges and philosophies behind these iconic peaks, the decision is yours. Don’t just ask “Can I do it?” Ask “Which lesson am I ready to learn?” Honestly assess your physical strengths and weaknesses, then choose your classroom and begin your training. The sea of clouds is waiting.